The Most Important Settings to Check Before Your DJ Set
By: Rob Steep
Playing in a live setting can be a nerve-wracking experience at the best of times, but you might eventually find yourself in a situation where the settings on the gear are all so foreign that it feels like you're fighting against the equipment and mixing feels much harder than normal.
Here are some tips on what to check when you step up to the decks, and how to troubleshoot issues if, and when they arise.
It might seem trivial at first, but small things like the tension of the jog wheels, the sensitivity of the tempo fader, the EQ type, fader curves, quantize settings, and the quality of the sound in the booth can all factor into whether your set will feel like a success or a train wreck.
Of course, regular Pioneer users can always load in the settings from their USB to sort most of these out, but you won't always be playing on Pioneer gear, and it's good to have a mental checklist to run through anyway.
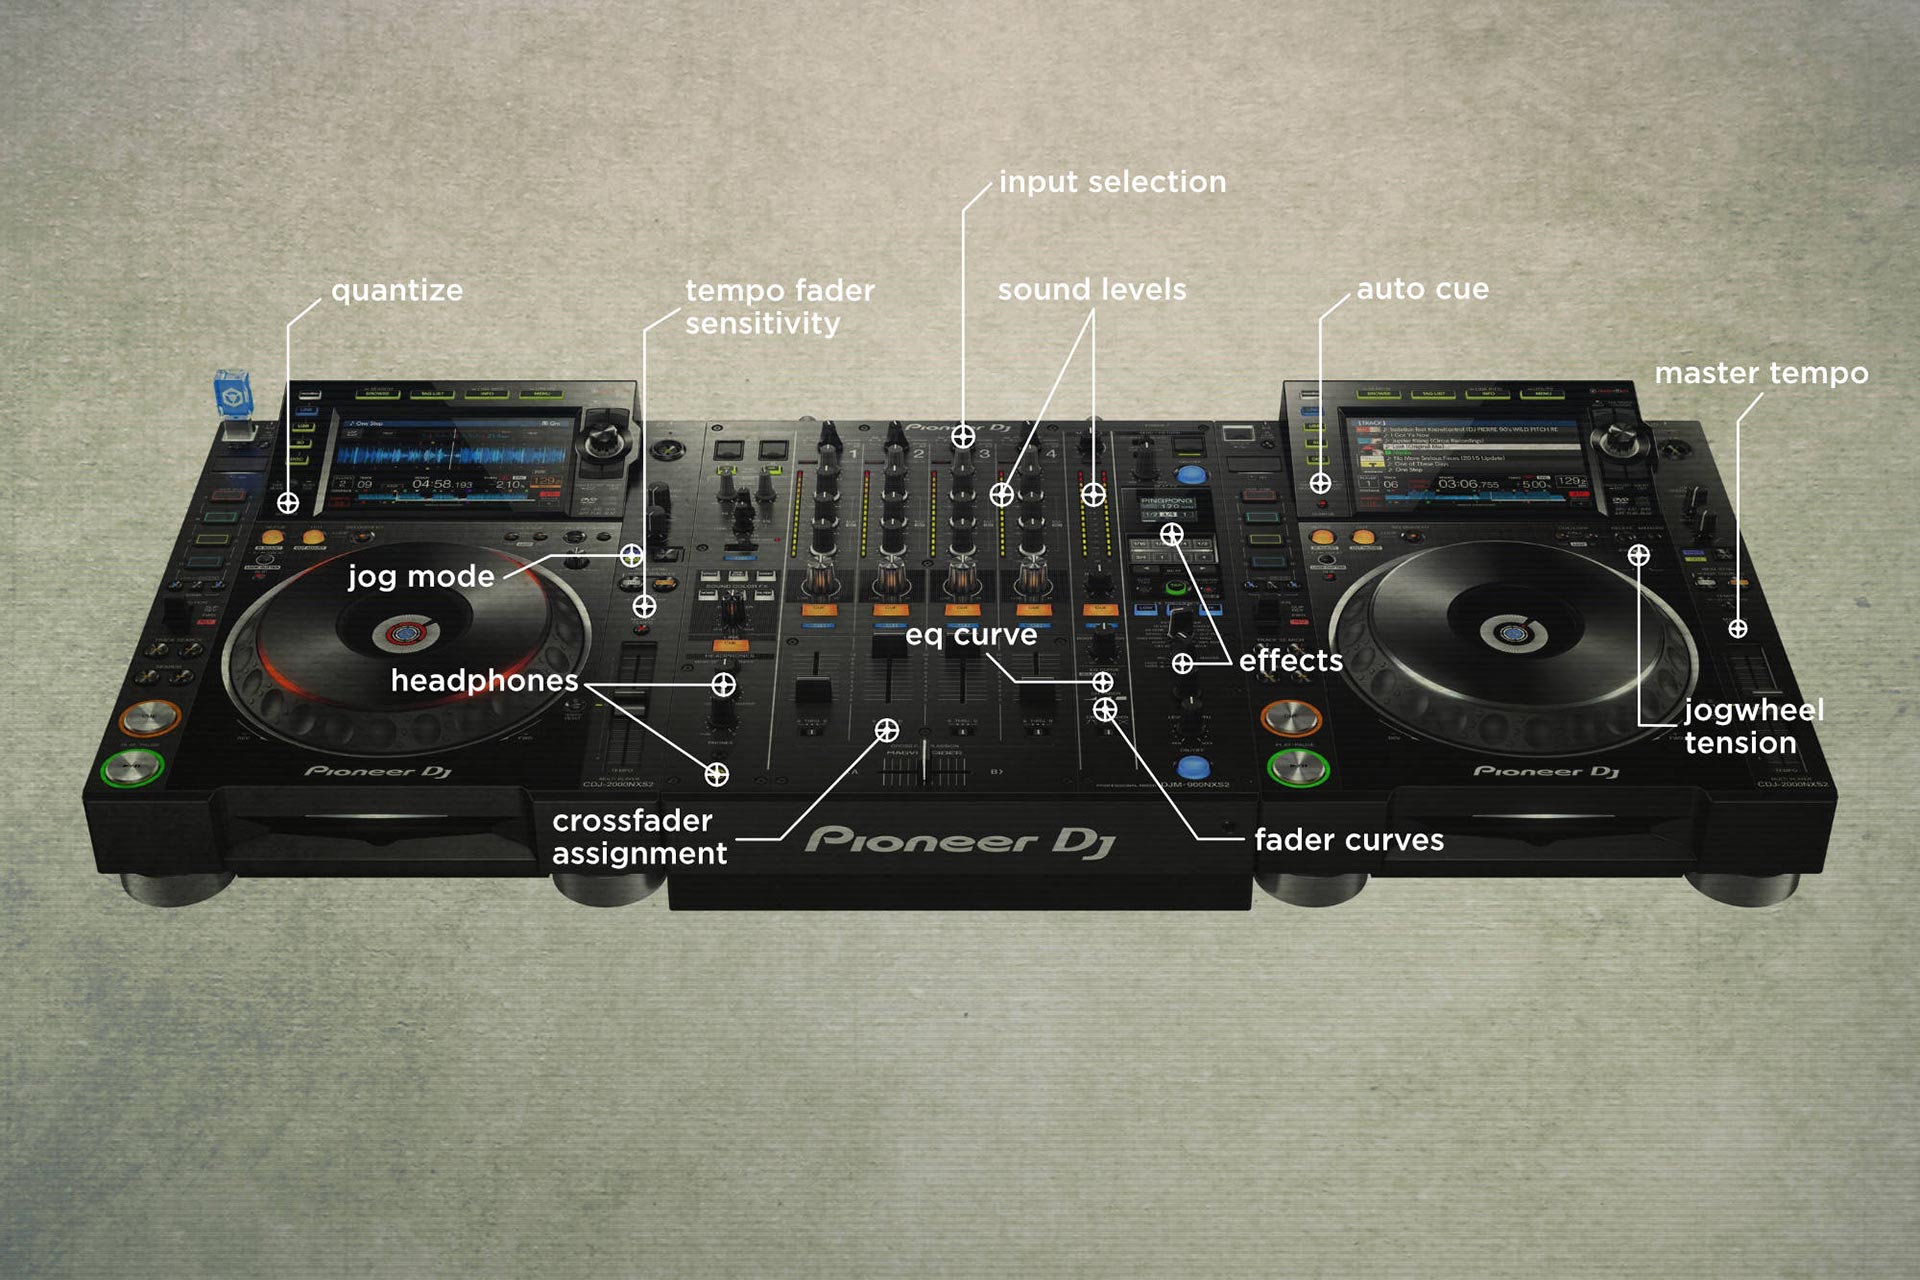
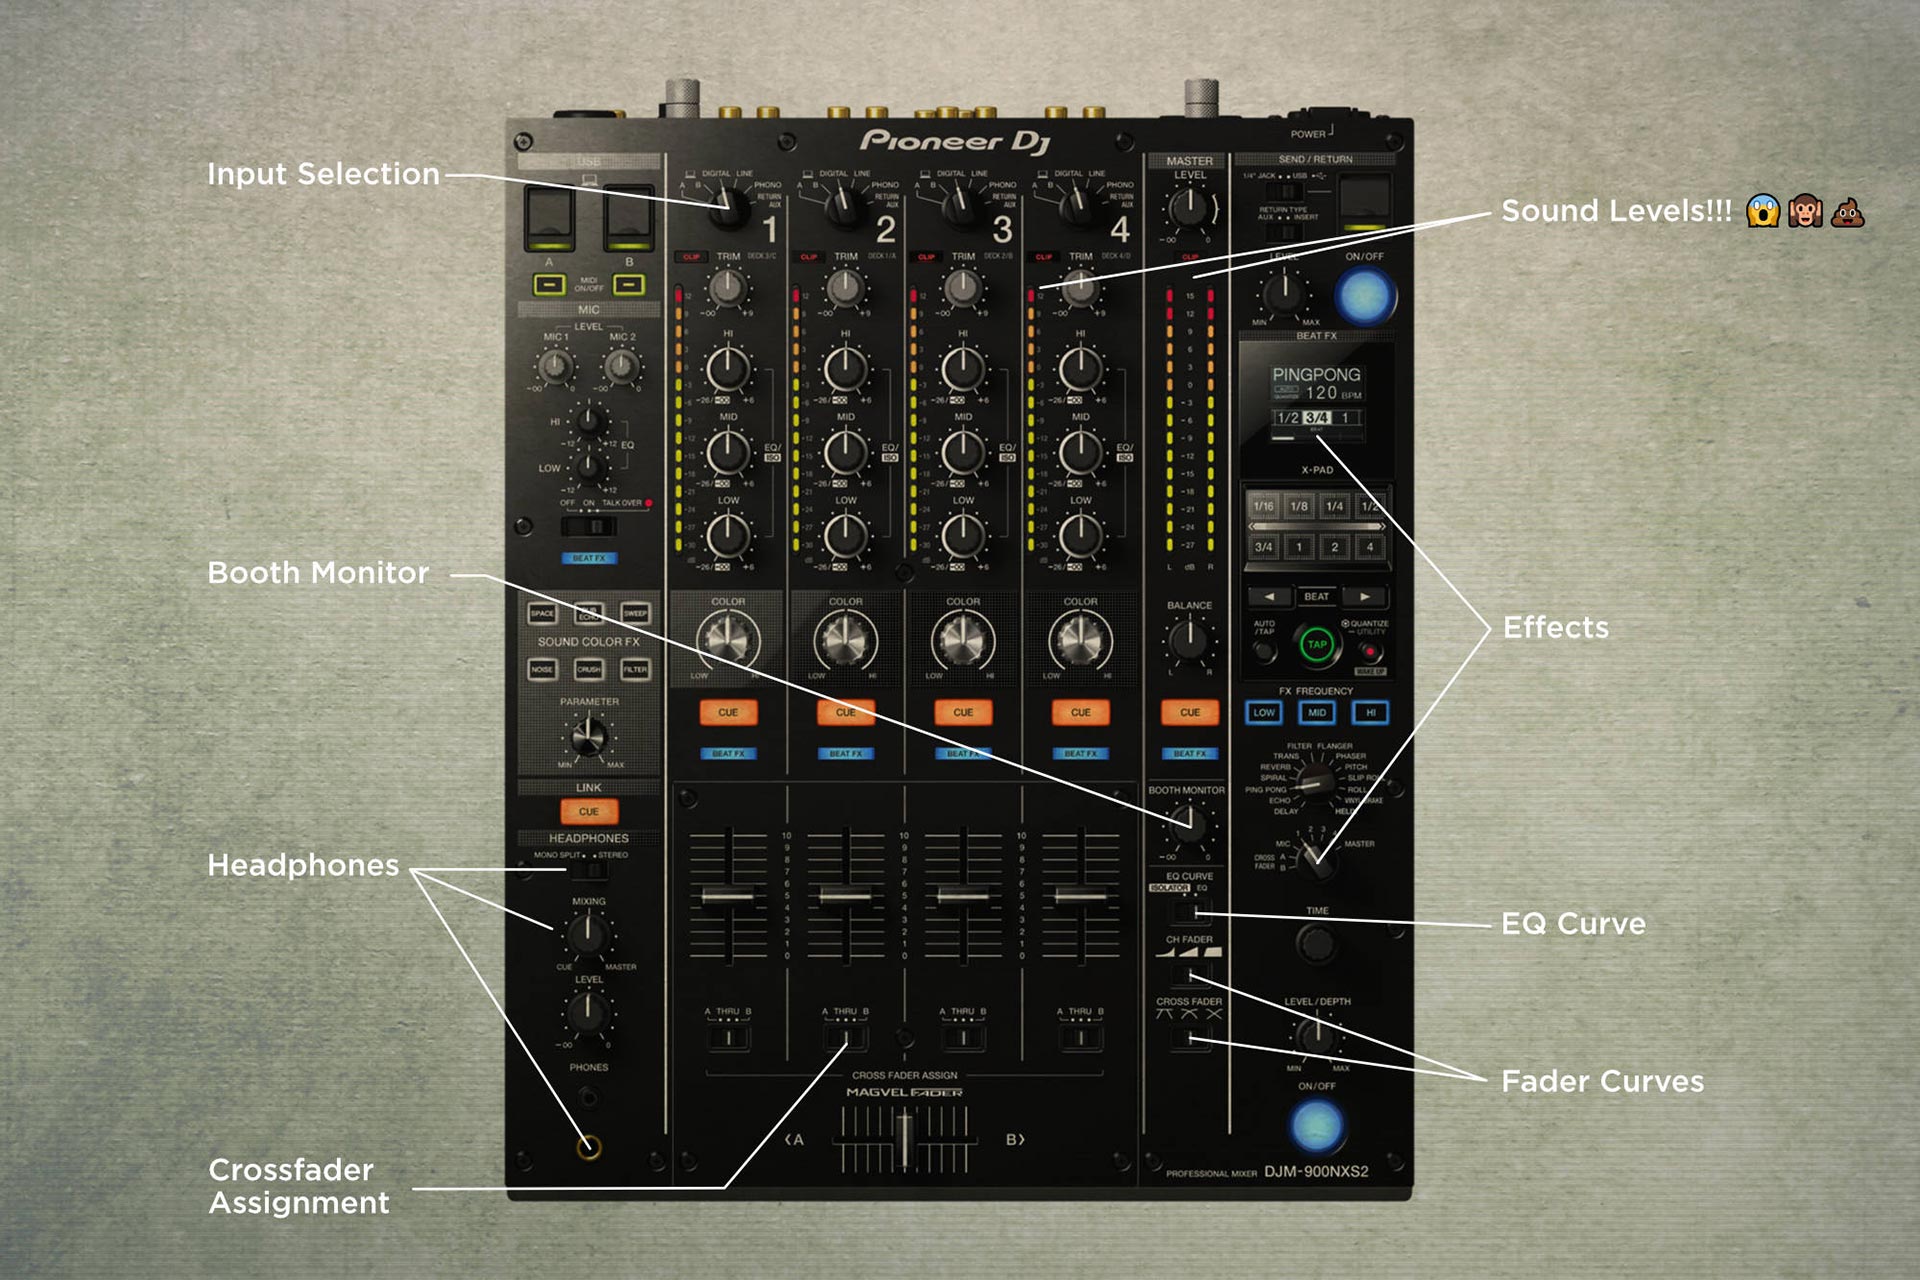
On the Mixer
Input selection
What to check: Set it to match your input source. Make sure there is sound coming through, and check that it's actually your music and not something else from a different source.
The input selector switch lets you choose between various input options such as line, phono, USB/digital or return. Most of the time it'll be set to line or digital for a set of CDJs but some setups could have multiple sources plugged into the same channel to enable switching between CDJs, turntables, external effects, a laptop, or even the venue's Spotify playlist.
Back in the old days, some DJs would use the input switch to scratch if the crossfader curve wasn't sharp enough, so it wasn't uncommon to find it left in the wrong position when you came on after them.
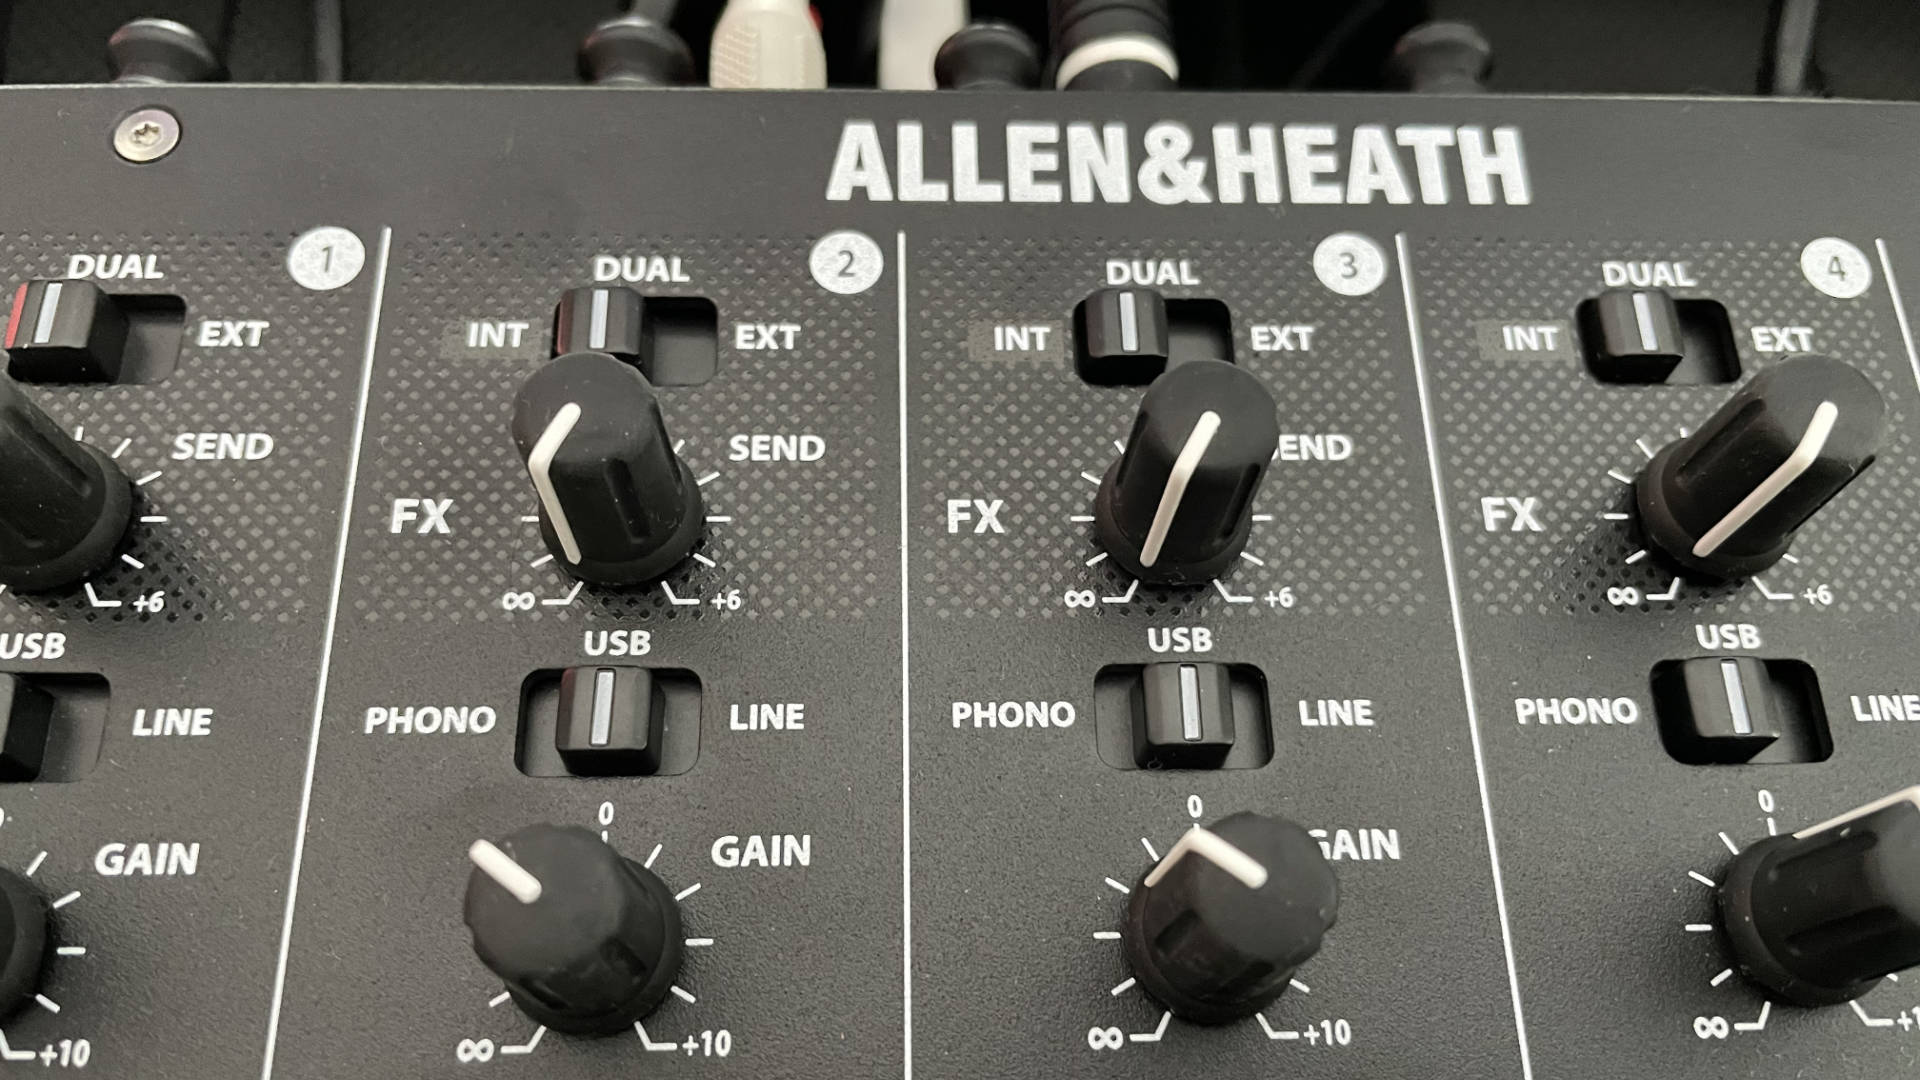
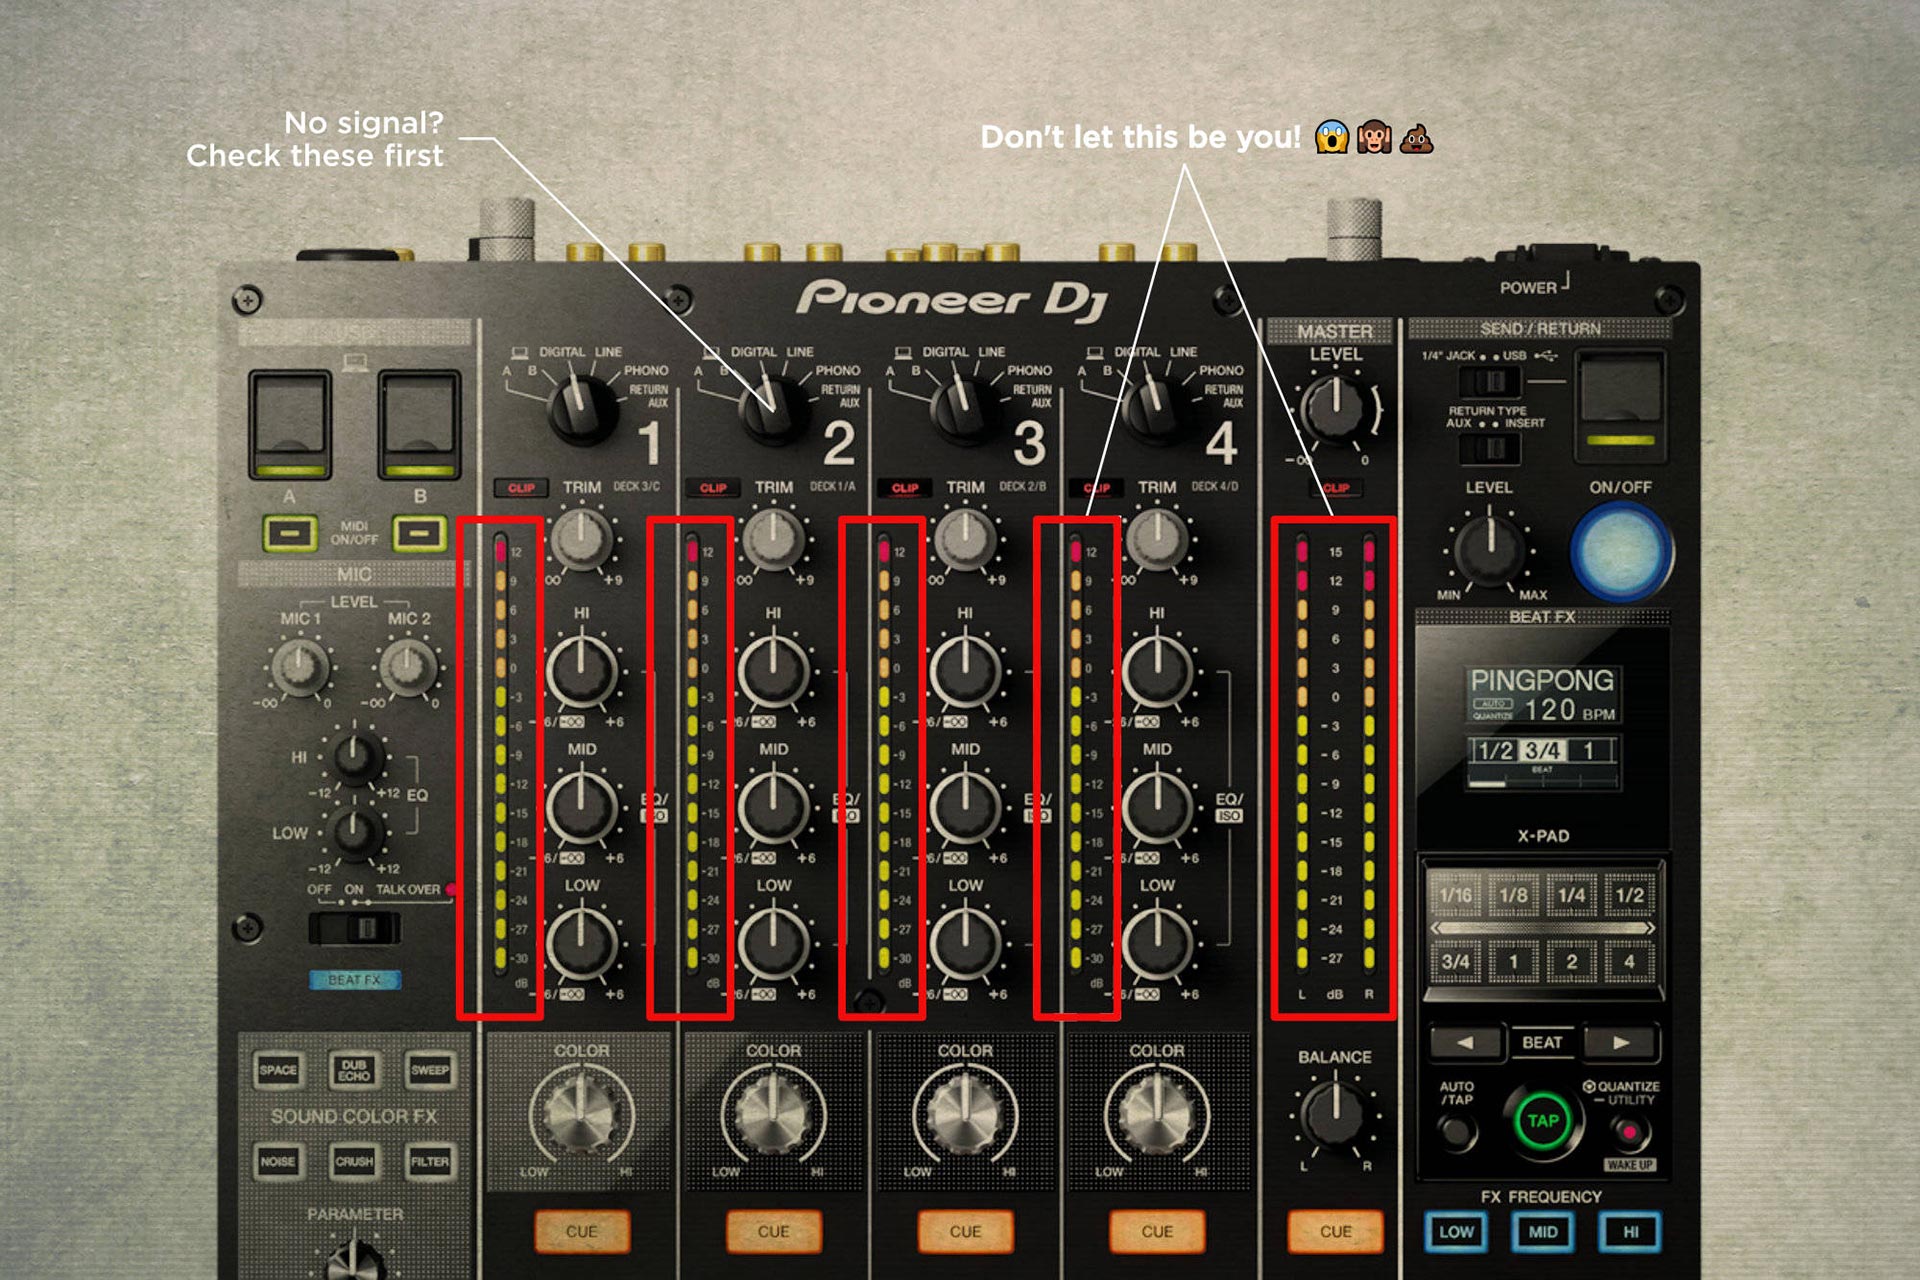
The type of input selector can vary a lot between different brands and models, but whatever mixer you're playing with, just make sure each channel is set to the correct input to match your sound source. If you press play and the levels on the channel don't show any activity, it's a sure sign that the source either isn't connected, or the input isn't assigned correctly.
Sound Levels (Gain/Trim)
Headlining is redlining, right?
What to check: Monitor the levels on each channel and adjust the gain/trim so they might just kiss the red here and there during the very loudest parts of the track.
Despite what all the Pioneer promo shots might show, a mixer lit up with solid reds is not a good thing so do whatever you can to prevent that from happening on your watch.
When DJing to a crowd, it can be easy to fall into the trap of cranking up the gain and EQs to get more out of the sound system without realising that you're actually making it sound worse.
Most club sound systems have limiters installed to keep the volume below a certain threshold to protect the speakers from damage if the signal gets too hot.
The limiters protect the speakers by compressing the signal, which flattens off the peaks of the waveform and reduces the dynamic range.
As the dynamic range is reduced, the breakdowns and the drops become nearer in volume as the loudest parts of the track butt up against the limiter and lose most of their energy.
You might be tempted to push the mixer even harder to compensate, but I encourage you to resist that urge, as not only will redlining the mixer make the sound tech hate you, but the music will become more compressed and distorted the harder it's pushed.
Not too loud, not too quiet. Just right.
If you step into the booth to see that the DJ before you is redlining the mixer, see if you can have a chat with the sound tech (if the venue has one) to find out where you should keep the levels to get the most out of the PA. You might need to do a complete reset at the start of your set, or slowly bring things down over your first couple of tracks so the dance floor doesn't feel a noticeable drop in energy.
It might sound counterintuitive, but bringing the levels down can be the best way to improve the sound quality and give the PA more drive. Give it a little room to breathe and everyone will think that you're some kind of sound engineering Jedi.
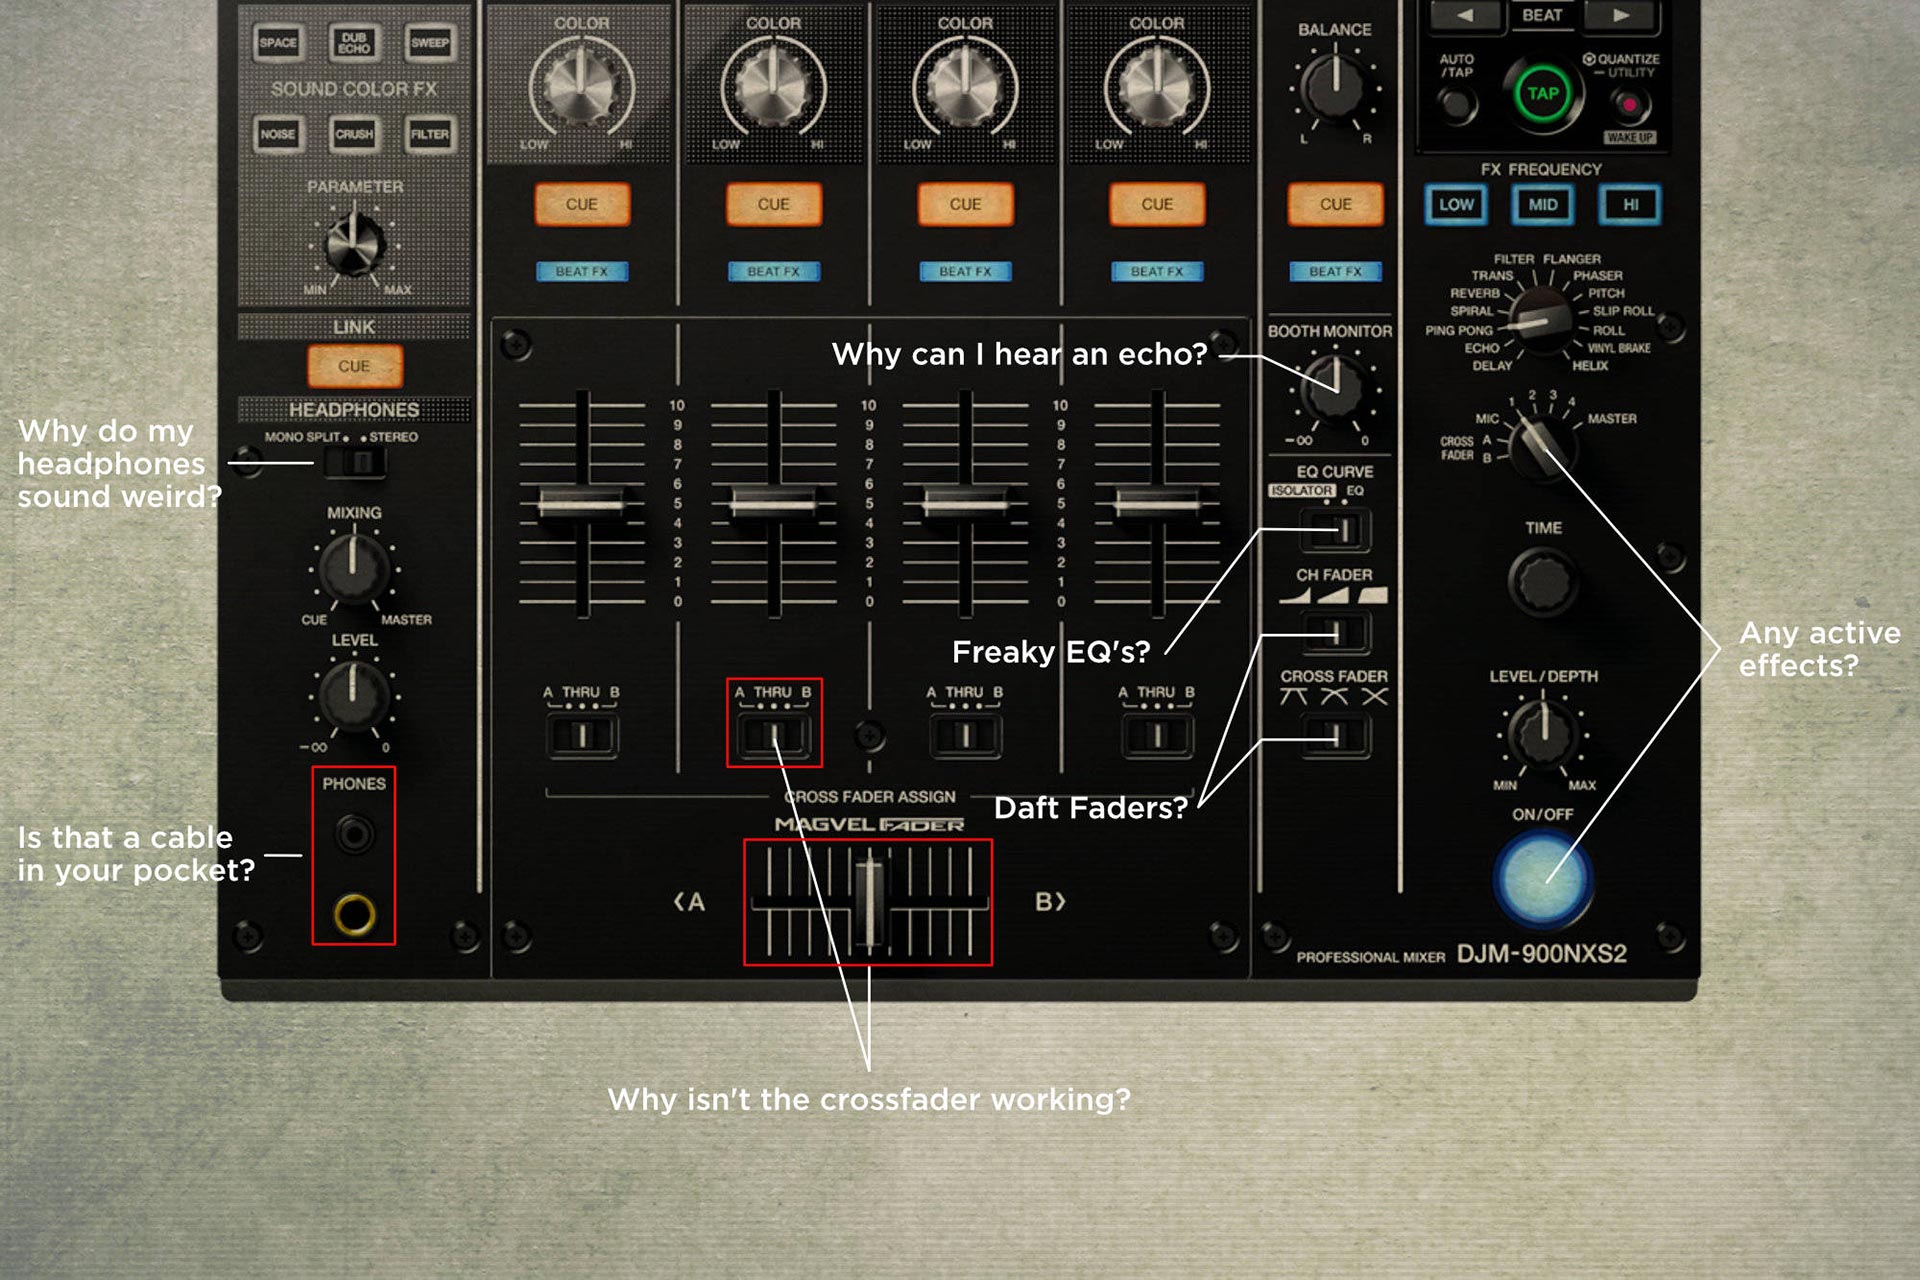
Crossfader position and assignment
What to check: Check whether the crossfader is active or disabled and verify which channels it's set to.
Club mixers let you assign the crossfader to particular channels or even disable it so it has no effect. Depending on how it's set up, you might not hear any sound as you bring up the fader, or you could accidentally treat the crowd to the sound of you cueing up your first track.
If you only use the line faders to mix or you're worried you'll accidentally knock the crossfader over to one side, now is a good time to disable it.
The opposite applies if you are a scratch DJ or like to do quick cuts between tracks. You'll want to check that the crossfader is active, with a nice sharp curve, and it's assigned to the correct channels.
Fader curve settings
What to check: Are you a scratcher or a smooth operator? Set your fader curves to suit.
This setting lets you switch between a long, smooth throw, a super sharp curve, or something in-between. If long, slow mixes are your thing, you might come in way too hot on your first mix if the previous DJ was using a sharp curve for quick mixing or scratching.
EQ Settings
What to check: To EQ or to ISO, that is the question!
This one isn't exactly the end of the world, but your first mix might not go exactly how you want if the EQ is set differently from what you're used to.
ISO mode has quite an aggressive EQ curve that fully kills the signal on each band. The full kill makes it possible to remove almost all traces of a bassline, but the aggressive response can create a noticeable drop in energy and make your transitions sound a bit thin if you're not used to it.
EQ mode has a less aggressive response that allows some of the signal to pass through. The track will still be audible with all the EQs turned to zero which might not be what you want, especially on a big sound system.
EQ mode is good if you like to retain a bit of the warmth when removing the low end, but the bassline of the incoming/outgoing track might retain too much energy if you're used to the full kill that ISO mode provides.
Effects
What to check: Are there any active effects? Which channel/s are they set to? Check that the BPM and beat fractions are set correctly.
If the previous DJ created an epic finish to their set, there might still be effects assigned to one of the channels that you can't hear until you bring up the fader.
Check that the BPM in the effects section is set to match what you're playing and that there aren't any filters, delays, reverb etc that could take you by surprise when mixing in your first track.
Are your headphones plugged in?
What to check: Can you hear anything through your headphones? If not, check your pockets 😅
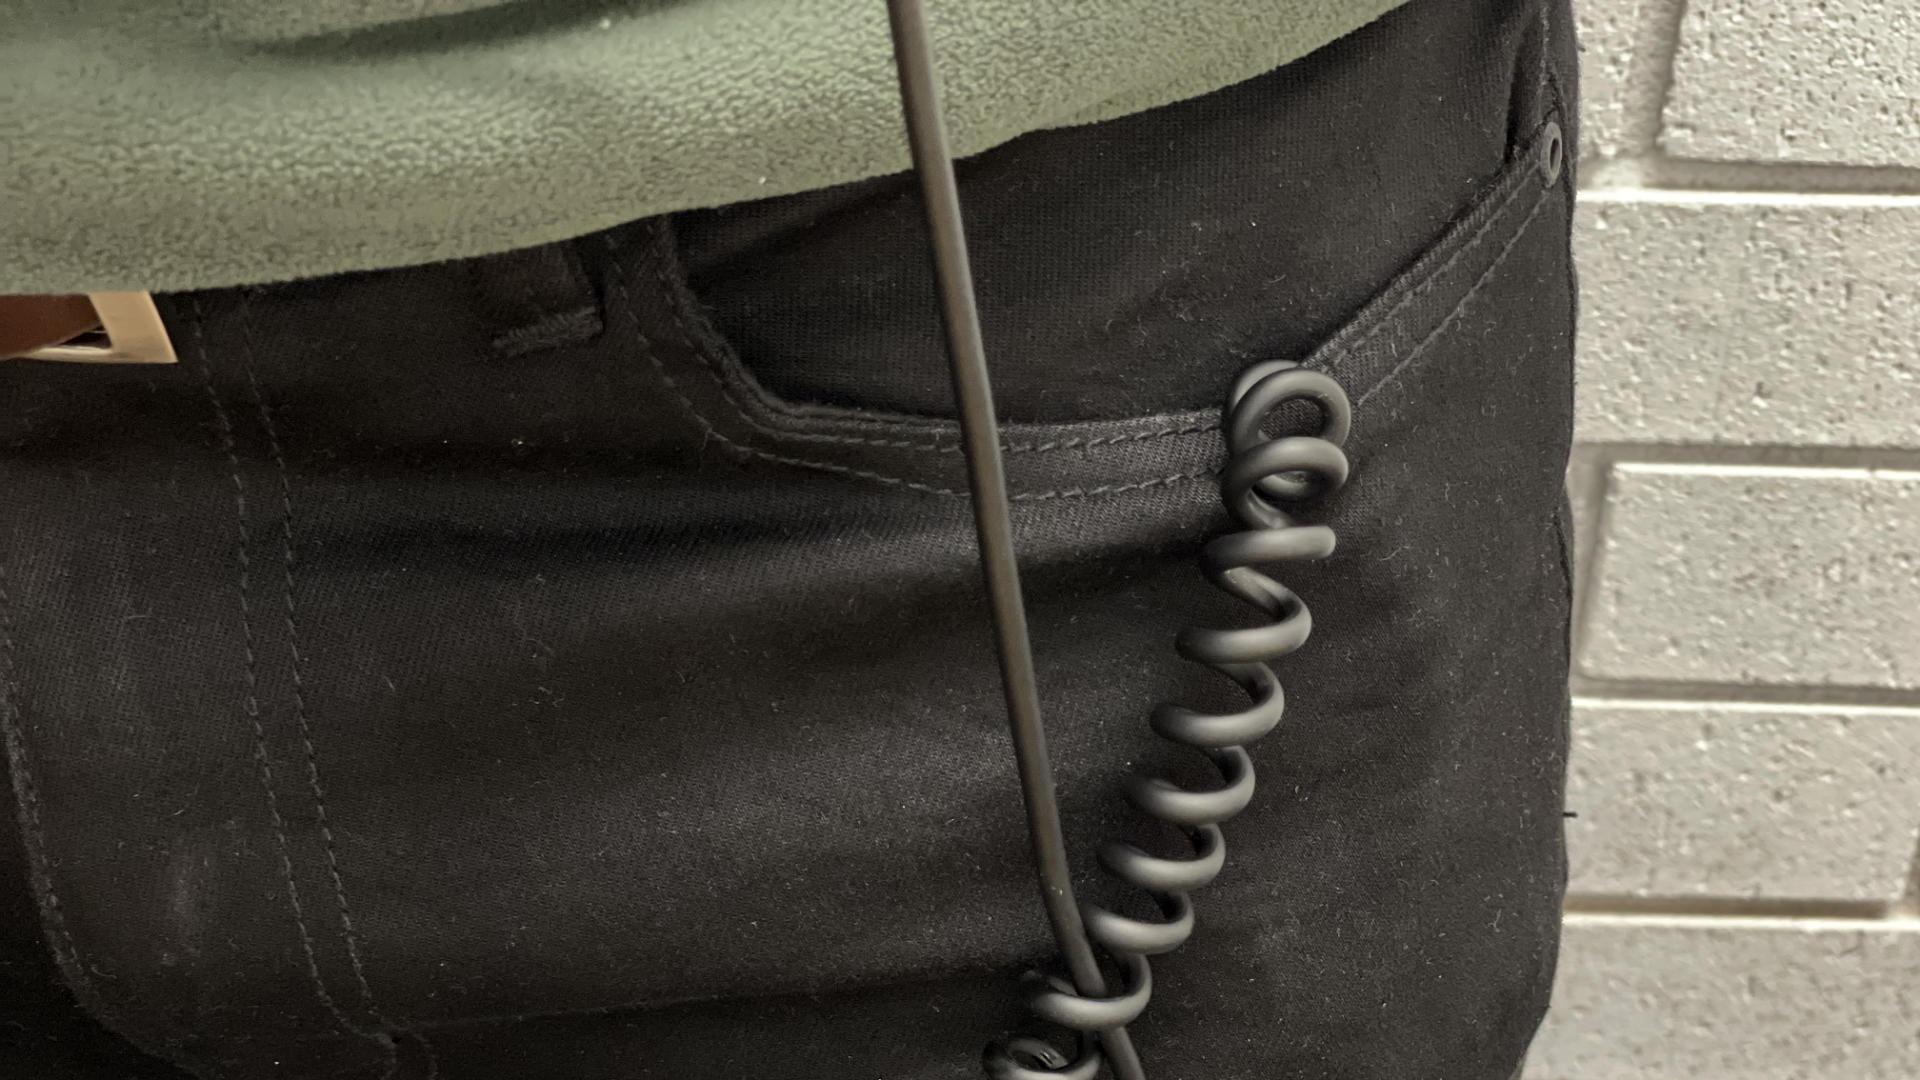
DJ booths can get quite cramped with gear, drinks, and people all over the place, leaving you without anywhere to put your headphones when setting up. You might put them around your neck and stick the cable in your pocket so you don't trip on it. That's not a bad thing, but don't forget to actually plug it into the mixer when it's time to start your set or you might freak out and think that something is wrong with the mixer or your headphones.
Don't worry if this happens to you. It's a classic that's caught out many DJs over the years, much to the amusement of anyone watching.
Headphone Cue Settings
What to check: Set to your preference (Stereo/Split/Master etc)
This one comes up a bit when playing B2B when each DJ has a different preference for how they like to cue up in their headphones. You might use one ear in the headphones and the other on the monitors, or split cue in the phones with one ear for each track. You might need to make a compromise or let the other DJ know that you'll be using a different setting for each mix. Switching between cue modes isn't a big deal, but just make sure you're both aware of what's going on.
Booth monitor volume
What to check: Set it just loud enough to block out the main PA, but not so loud that you blast your ears unnecessarily.
Booth monitors can make or break your ability to hear good-quality sound when playing on a club system. If the booth monitors are turned off or the volume is set too low you'll only hear delayed sound from the main PA that has bounced around the room and come back mixed in with crowd noises. If you're not used to mixing in your headphones the set isn't likely to go well.
In a club setting, the Master output will normally be off-limits to the DJs and it's up to the sound tech to adjust the volume as the night progresses. The booth monitors are there for your use though, so make sure you know where the booth monitor control is located and don't be afraid to adjust the volume to suit your ears throughout the night.
The main PA will get louder during the night as the venue fills up so it's good practice to "reset the booth" from time to time to ensure you're getting the best sound without blasting your ears unnecessarily. To reset the booth, turn the booth monitors to zero and give your ears 30 seconds to 1 minute of rest, then slowly bring up the volume until it's just loud enough to override the main PA.
The further away the sound is, the more of a delay you'll hear, so it's important to set your monitors to the right level to get good quality sound without punishing your ears more than you need to.
After resetting your booth, do the same with your headphones and match the volume to the booth monitors so you don't end up with a see-saw of ever-increasing volume throughout the night. Your ears are your livelihood as a DJ, so do what you can to look after them. Tinnitus is the worst!
If people are jumping on the mic to make announcements during the night, they'll probably turn the booth monitors down to prevent feedback. Don't forget to reset your booth each time this happens or you'll wonder why mixing is suddenly such a struggle. Maybe you've had too many drinks, or maybe the sound just sucks!
On the Players
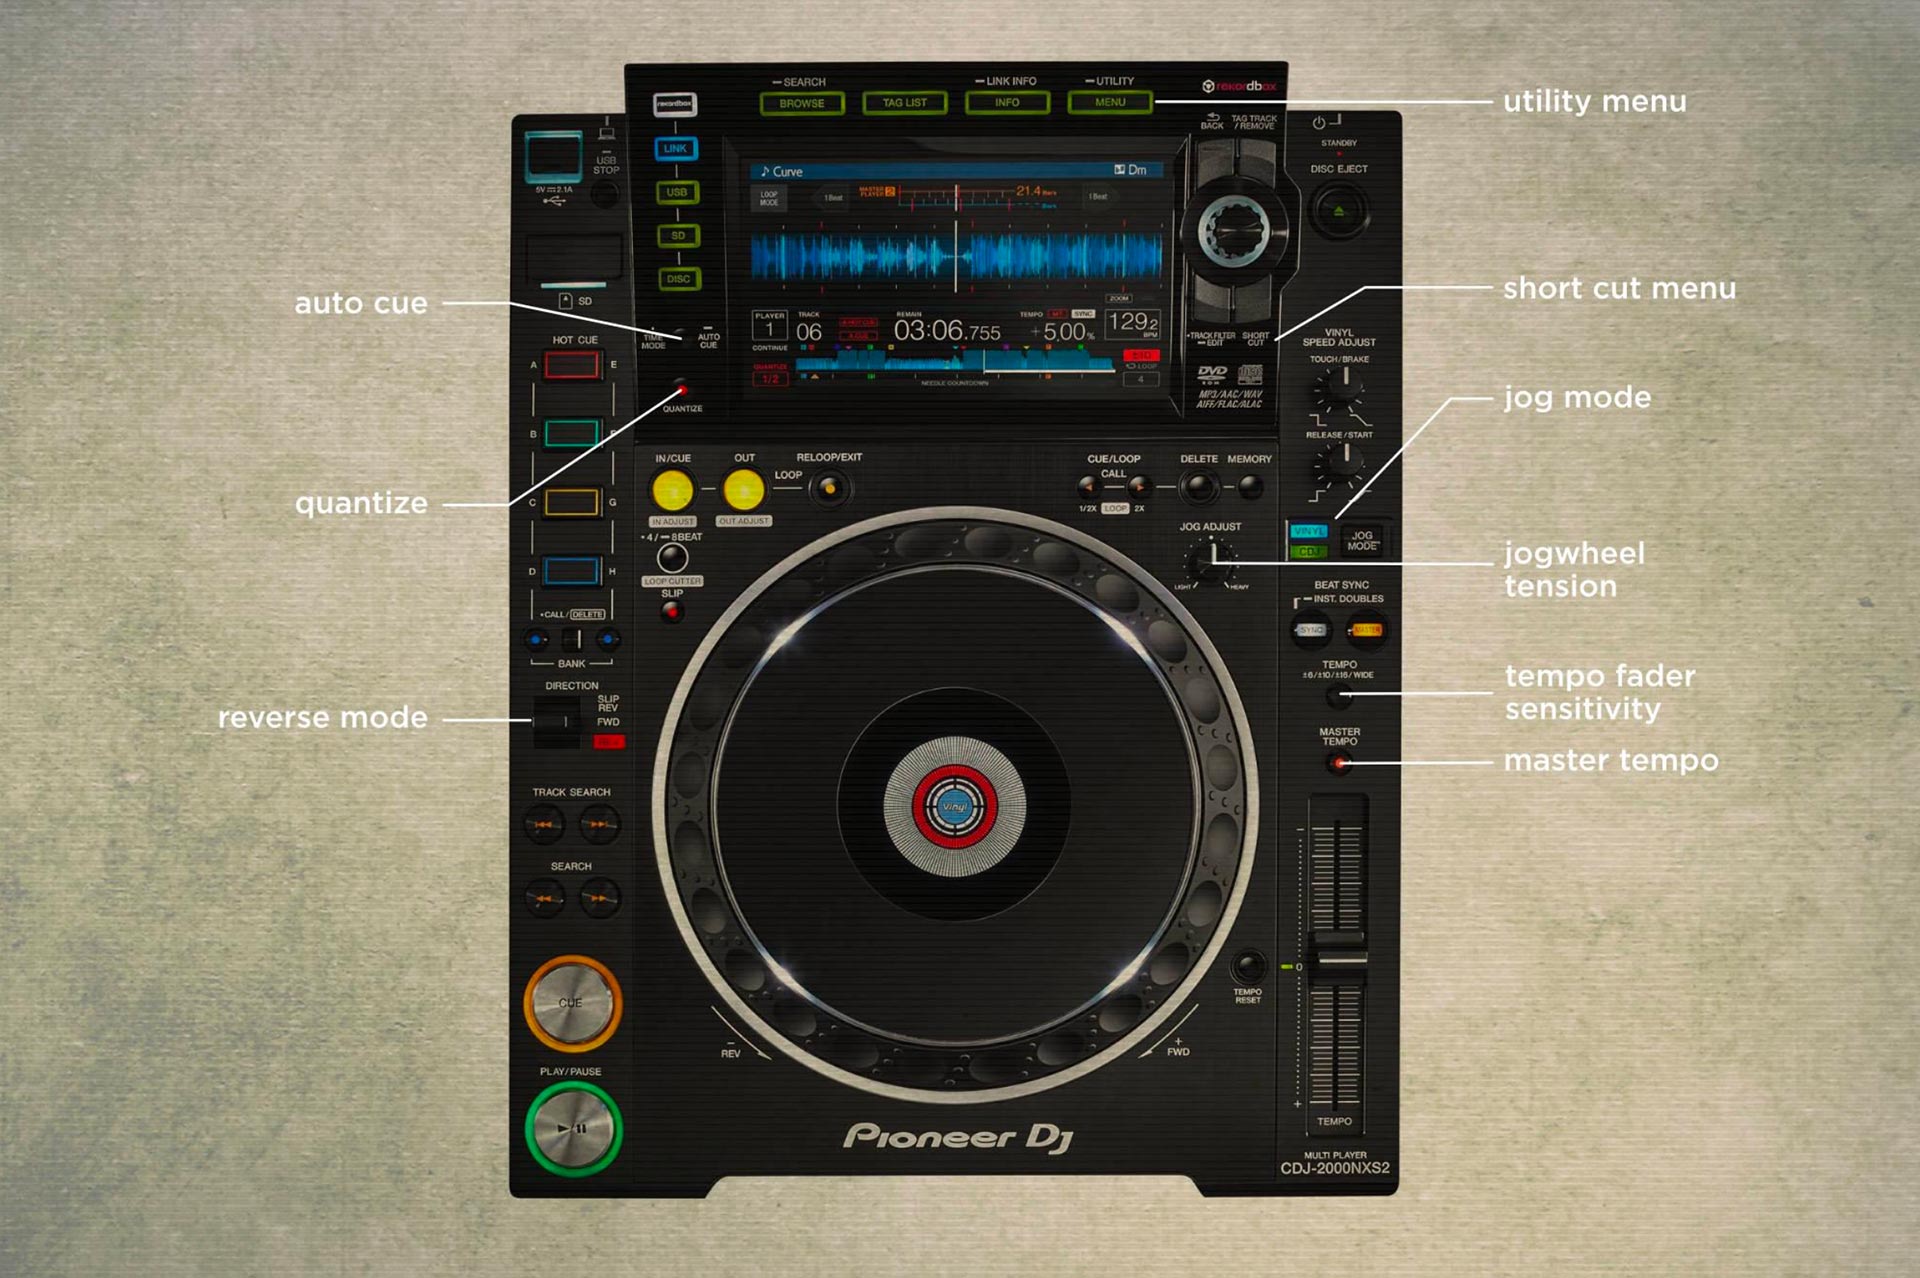
Quantize
What to check: Check that Quantize is either on or off and set to a value you're used to.
Quantize helps you set your loops and trigger your hot cues on the beat. It can either be a help or a hindrance depending on how you play and what you're used to. Most of us can't live without it but finger drummers and hot cue mashers might prefer to switch it off to maximise their creative freedom.
If you like to loop in during transitions and quickly set loops on the fly Quantize really is a must but the 1-beat default can feel a bit weird until you get used to it. Setting it to a smaller value such as 1/4 or 1/8 beat makes it possible to mash the hot cues and cut up vocals to your heart's content while still retaining the ability to set rock-solid loops on the fly.
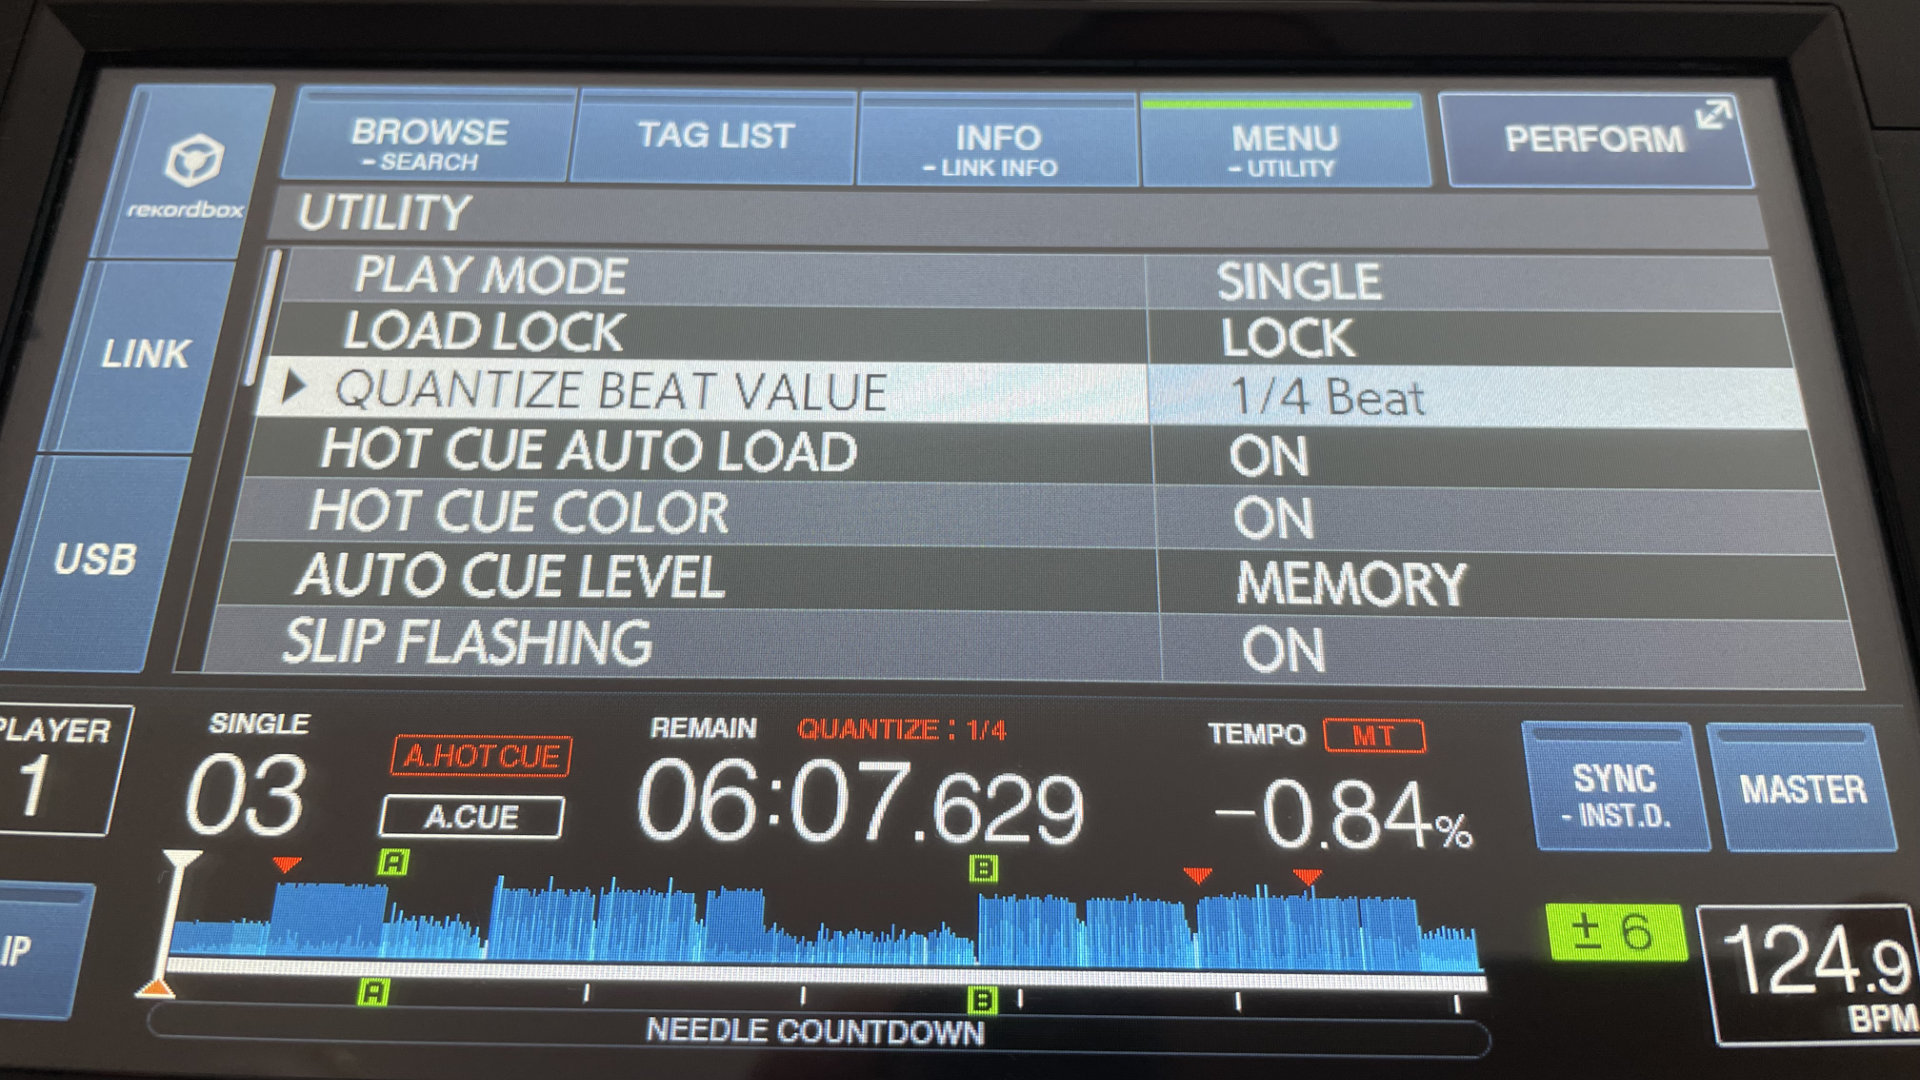
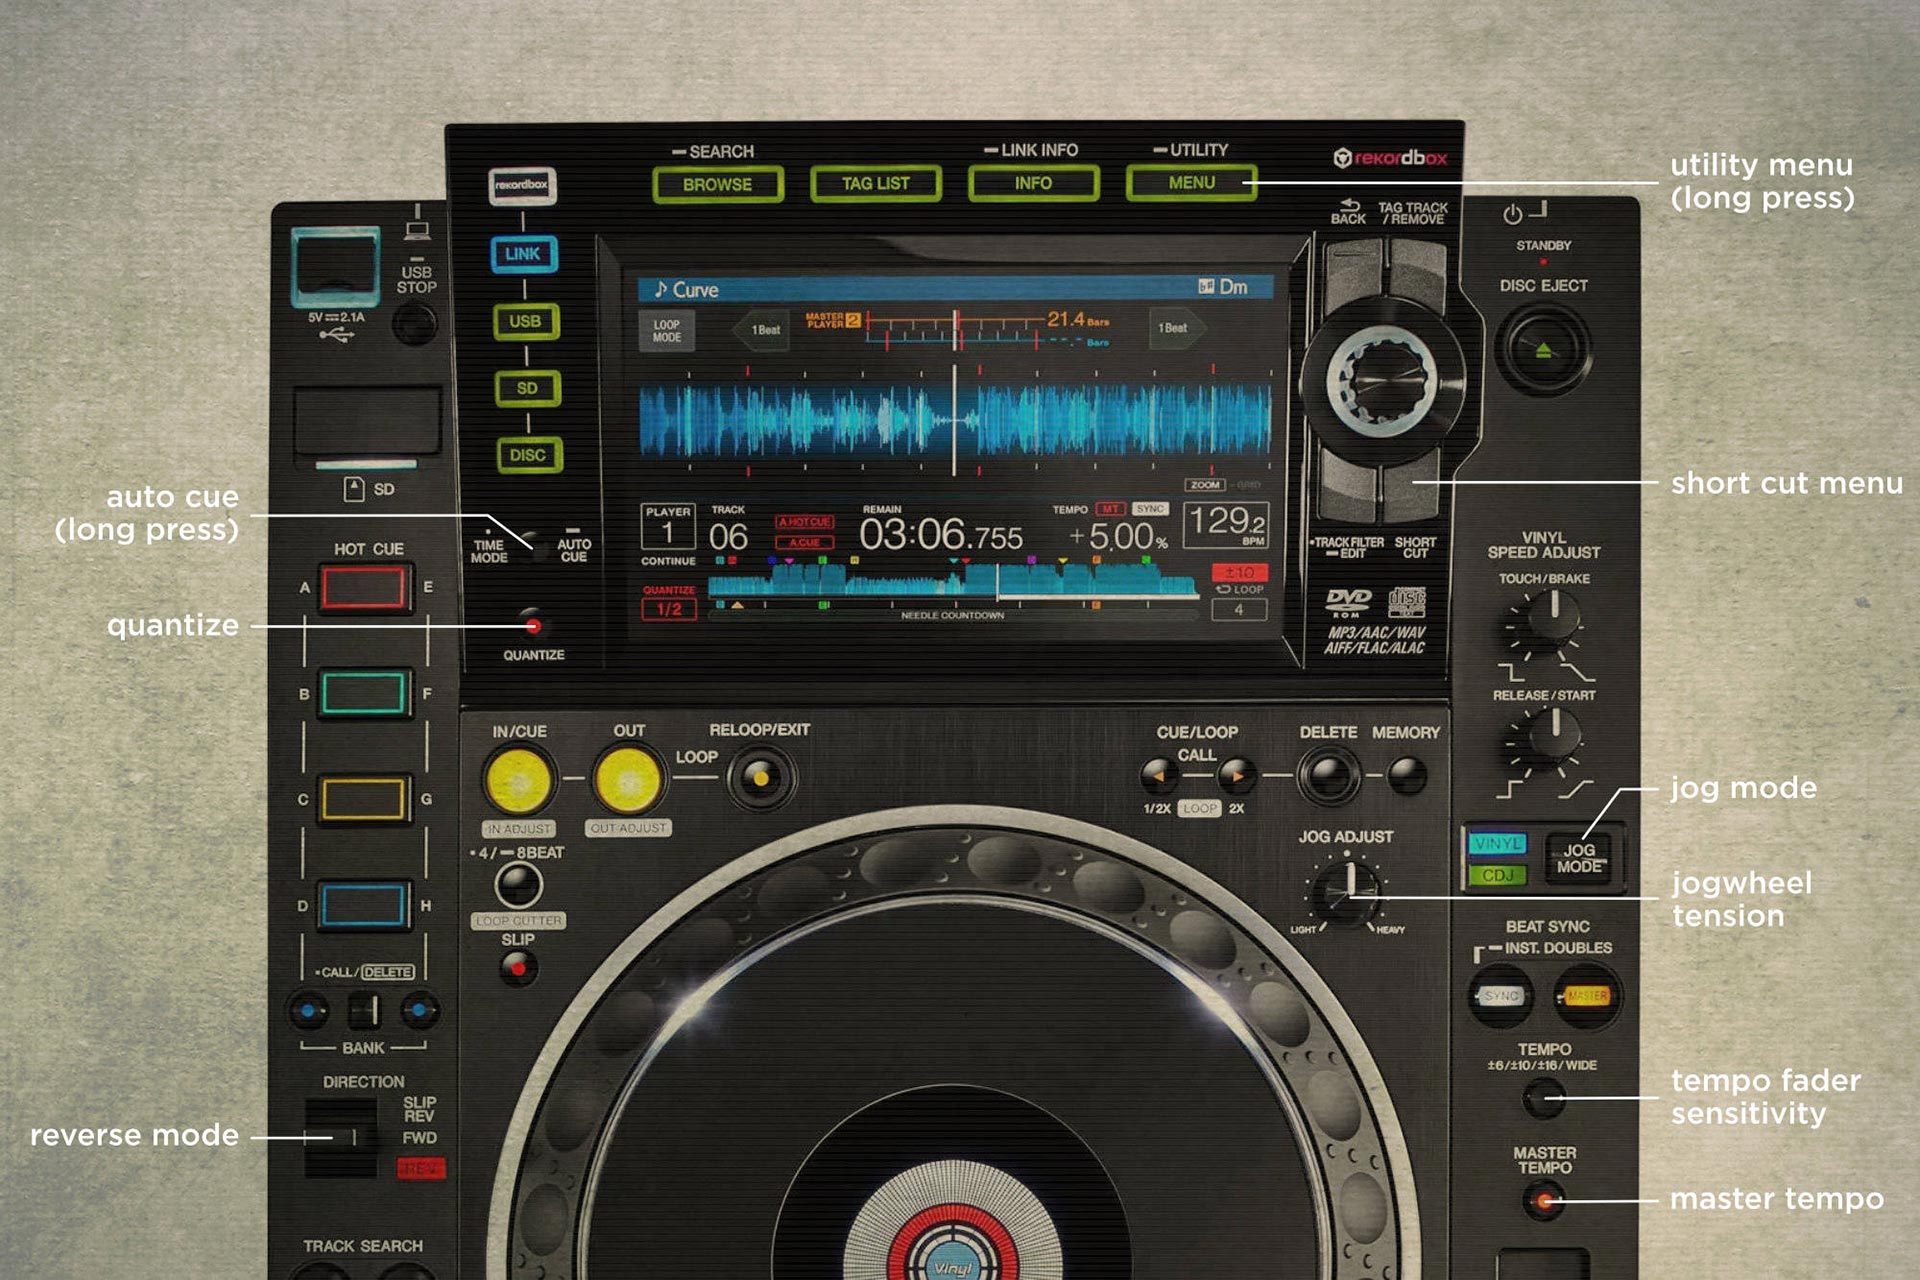
The utility menu (accessed by long pressing the menu button) is one place to set your quantize values along with other important settings.
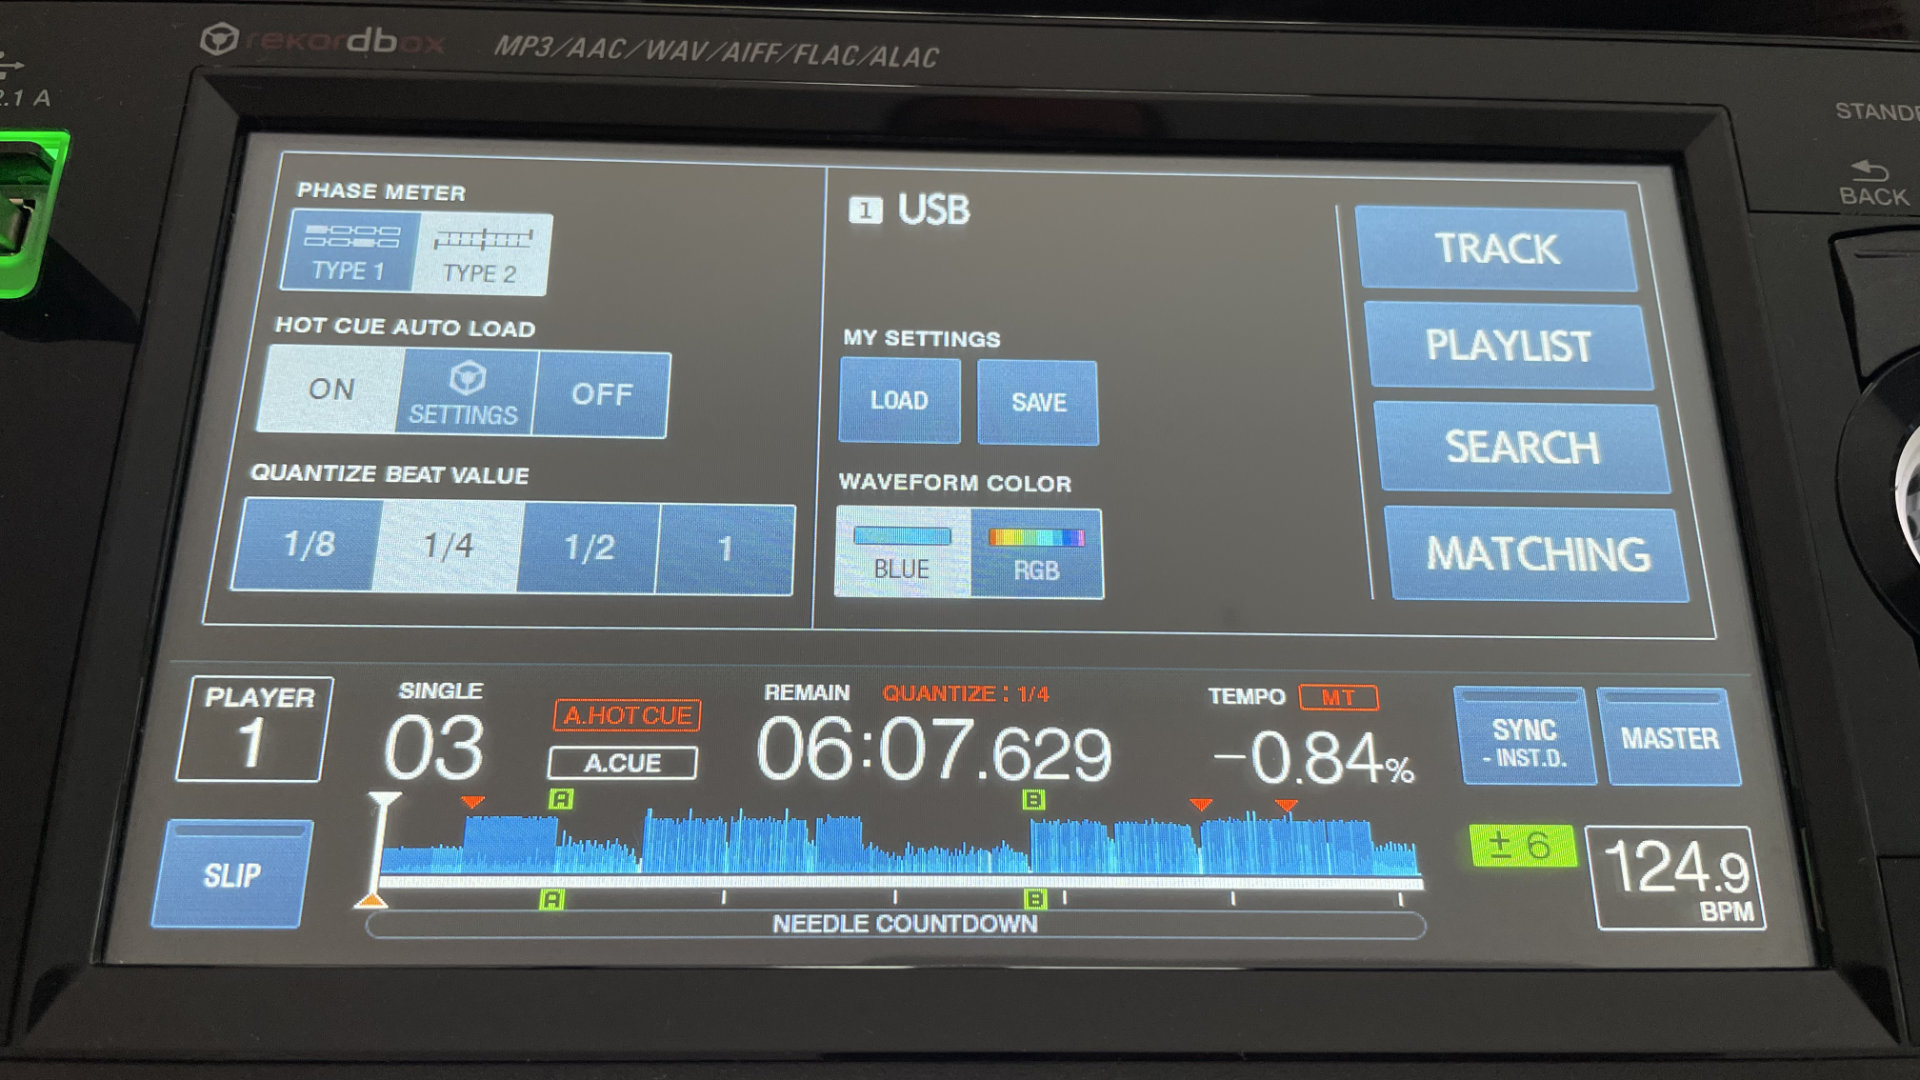
The Shortcut menu (accessed via the shortcut button) gets you there faster and gives you access to other handy settings on one screen without the need for scrolling.
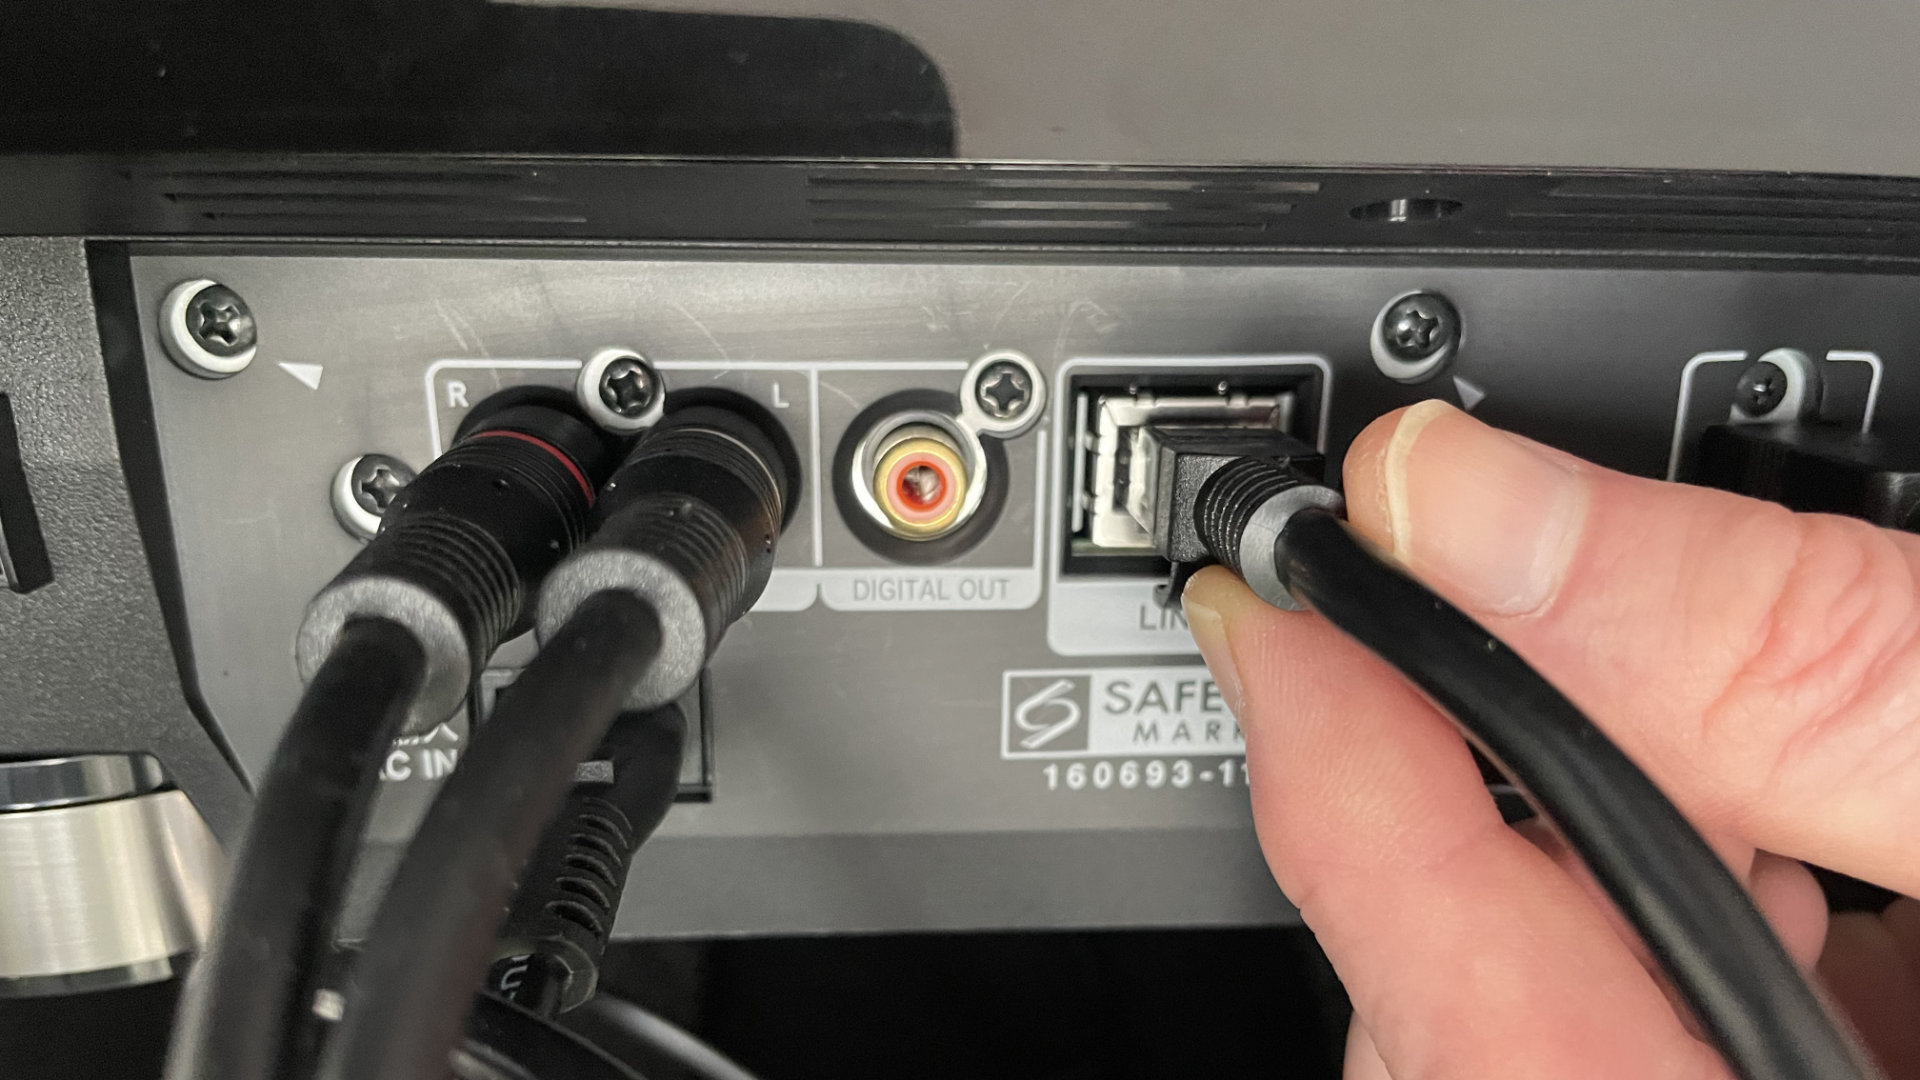
Check Pro DJ Link Connection
Check that Pro DJ Link is working correctly, and even reach behind the decks and give the cable a really gentle wiggle. If the player light goes grey it means that the link has been lost and you should probably use a USB in each deck. It's better to find out now rather than run the risk of losing the connection halfway through your set.
Tempo fader sensitivity (6/10/16%/wide)
What to check: Use a smaller number for finer control and a larger number for quick mixing.
BPM increments at each setting:
0.02 % at (6%), 0.04 % at (10%) and (16%) and 0.05 % at (wide)
The best setting depends on the DJ, the genre they're playing, and their style of mixing. 6% provides the finest control but requires the largest movement of the tempo fader which makes matching the BPMs a little slower. Wider settings are better for quick mixing and matching tracks with a larger difference in BPM but you'll need to work harder to keep them in time during longer mixes.
CDJs default to 10% when they are switched on which is a good middle ground that is perfectly usable for most situations. A good thing if you forget to check or don't have any settings saved on your USB.
The wide setting is fun for doing tone play or other deck effects as you can slow the track down to a complete halt, but small movements of the tempo fader make a large difference to the BPM which can make mixing more difficult.
Master Tempo (Key Lock)
What to check: Do you like to mix in key? Make sure you have Master Tempo activated.
It seems like an odd choice for Pioneer to call it Master Tempo rather than Key Lock, but either way, it's something you'll want to have turned on pretty much all the time.
This setting keeps the song playing in its original key regardless of what speed it's played at. Without Master Tempo activated the key will shift according to the playback speed, which makes vocals sound like the chipmunks when the track is sped up and like a Walkman with flat batteries when it's slowed down.
Playing a track at a wildly different speed to normal with Master Tempo activated forces the software to work overtime to keep the key locked in which can reduce the sound quality in some situations, but it's not something most of us will ever experience when playing tracks with a similar BPM.
Auto Cue
What to check: In 99.9% of cases it's better to have Auto Cue turned on.
With this turned on, each new track automatically skips to the first set cue point and will be paused, ready for you to hit play when you're ready. If the track starts playing automatically when loaded in it means that Auto Cue is turned off.
In almost all cases Auto Cue will be turned on, but people might turn it off if they want to set the deck to continuously play through a playlist while the decks are unmanned during the early stages of the night, or if the DJ needs to run to the bathroom.
If you do find that Auto Cue is turned off, it's a good idea to go into the utility menu on the player to check that the play mode is set to: PLAY MODE: SINGLE.
If the play mode is set to PLAY MODE: CONTINUE, the next track in the playlist will load automatically when the previous one reaches the end. It won't actually play if Auto Cue is turned on but it could still lead to unexpected results.
A red A.CUE indicator tells you that the player is cueing the track from the audio level rather than a preset cue point. To change this, go into the utility menu and set it to: AUTO CUE LEVEL:MEMORY which should change the A.CUE indicator to white.
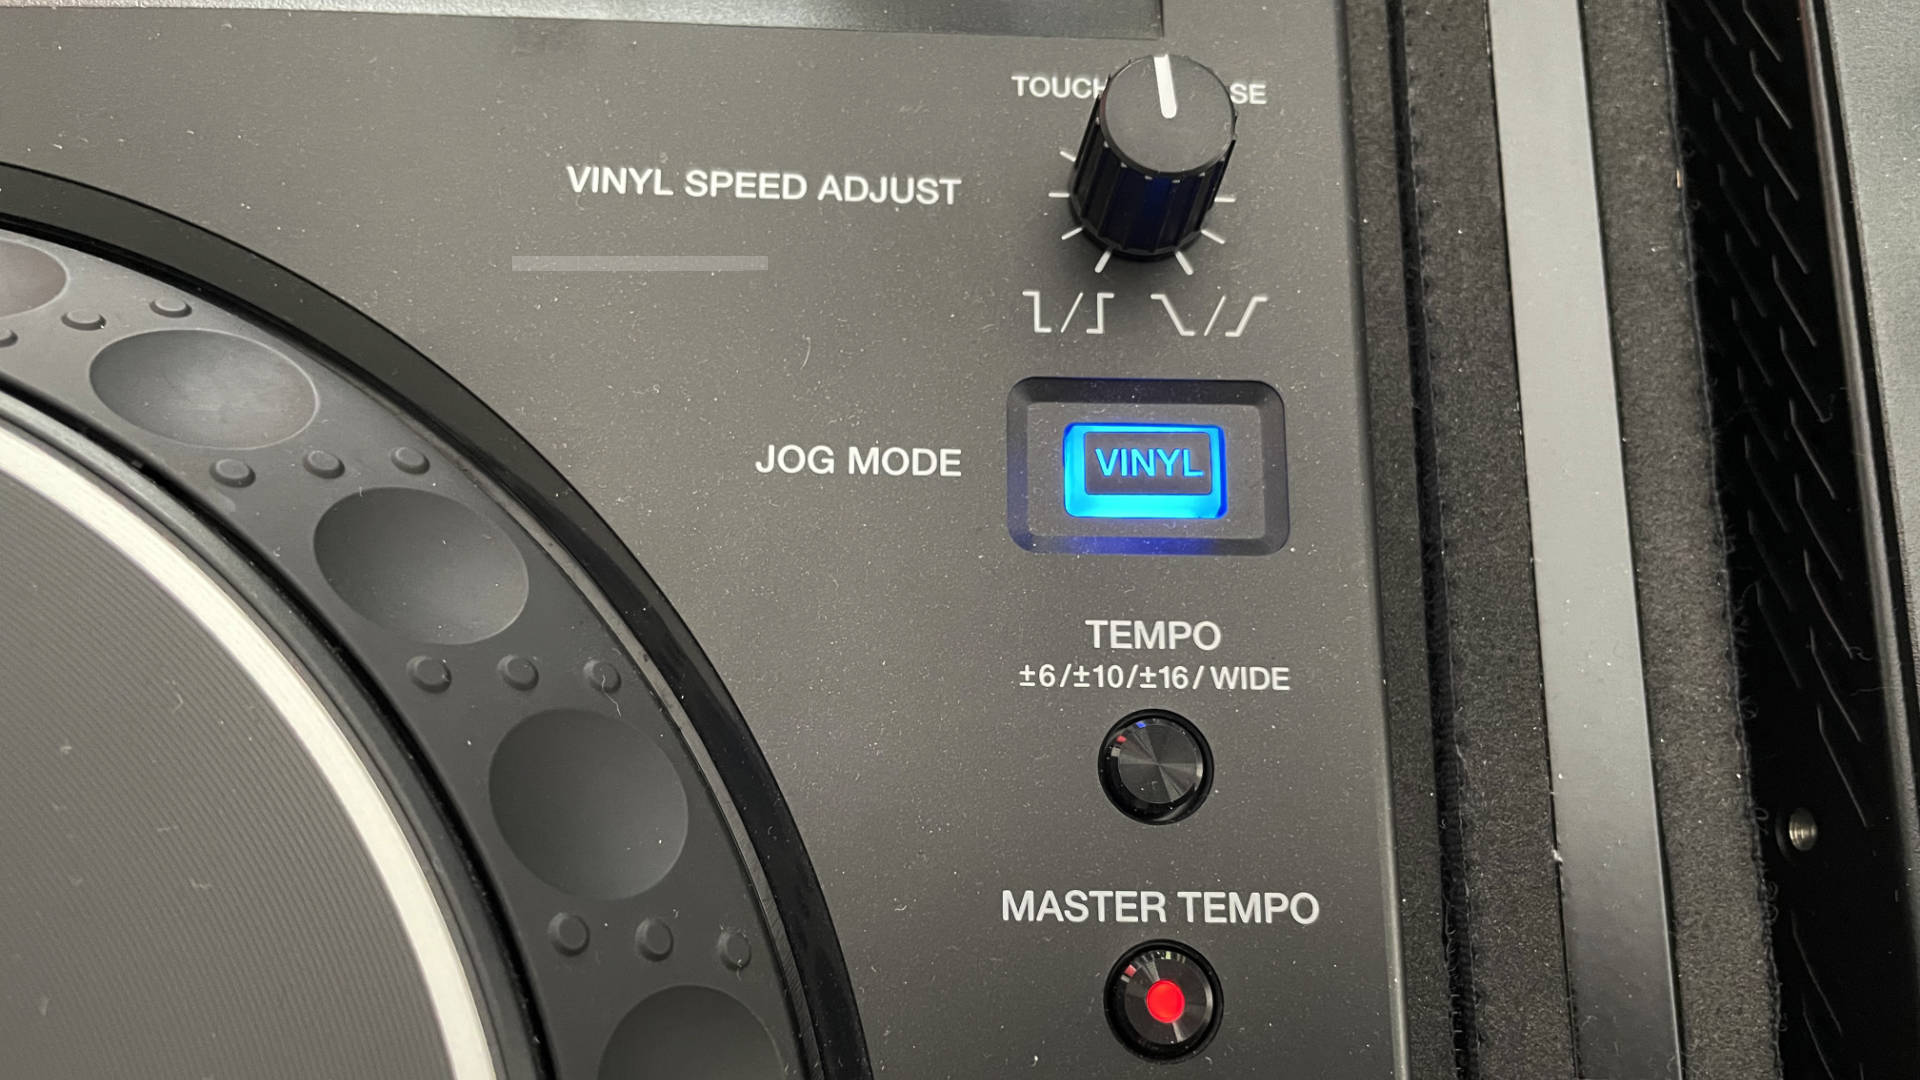
Vinyl/CDJ Mode
What to check: In most cases you'll want it set to Vinyl mode so you can manipulate the track by touching the top of the platter.
With Vinyl mode selected, touching the top of the platter stops the track and nudging the side speeds it up or slows it down, just like a record on a turntable. If you want to be able to scratch or do spinbacks, you'll need to have Vinyl mode selected.
CDJ mode is the old-school way CD players used to work before the original CDJ-1000 came out. This mode behaves the same regardless of where you touch the platter and touching the top doesn't stop the track like in vinyl mode. You can only use the jog wheel to speed up or slow down the track.
Because you're not able to manipulate the track by touching the top of the platter CDJ mode makes a stuttering sound when it's paused to tell you where it is. If you hear a weird stuttering sound when pausing a track, the deck isn't broken. You just need to switch it over to Vinyl mode.
Jogwheel Tension
What to check: Make sure it's not super heavy or super light. Somewhere around 12-1 o'clock is a good place to start.
Some players have an external knob to adjust the tension of the jog wheel to dial it in for scratching and epic spinbacks, but this can also affect how much the track speeds up or slows down when nudging the jogs during a mix.
If beat matching seems harder than normal and you're either under or overcorrecting each time you nudge the track, the jog wheel tension could be the culprit. Check the tension and tweak it until it feels more like what you're used to.
Some players, such as the XDJ-1000 don't give you the option to set your jog wheel tension, so you just get what you've been given. Anything else is going to feel a bit weird once you've got the muscle memory locked in.
Another scenario where the jog wheel tension can come into play is in really bass-heavy venues where vibrations in the booth can make the platters move around. If you're setting manual loops and adjusting the endpoints with the jog wheel, that unwanted movement can make it all go a bit wonky, but Increasing the tension should sort it out.
Reverse Mode
What to check: Make sure the decks haven't been left in reverse.
This one is pretty rare, but if the deck has been left in reverse mode it'll start playing the track backwards, which could really do your head in if you don't know what's going on.

Hopefully, these tips will help hit the decks with confidence, knowing that you can troubleshoot any issues as they arise. Let us know if there are there any crucial settings that you think we've missed and we'll add them in.
RELATED POSTS

Rekordbox 7 has landed and the internet has feelings. Some people love it, others are tearing their hair out. In this guide I'll show you what's new, what's great, what's not there yet, and how to actually use the software to prepare a set from scratch.

If you're anything like me, you've probably sat there scrolling endlessly through your music library wondering which two tracks might magically work together. You find a track you love and think, "This should mix well with that one..." but once you try it? Total mess. Either the keys clash, the energy doesn't match, or the drop just feels awkward. This was me - until I discovered Mixed In Key 11 Pro.

If you're a DJ and have a club show coming up and you're nervous about making the jump from controller to club gear and you want to be prepared for all eventualities in this video I'll give you 5 quick steps to trouble shoot the gear plus a mini checklist of little settings most people over look so if anything goes wrong you'll be able to handle it like a seasoned pro.
Choosing the most suitable DJ gear can feel like a daunting task, with the seemingly endless options from different brands with different softwares, it can become overwhelming. This buyer's guide has been written with the goal in mind to help narrow down this process for you and provide some direction, helping you make an informed decision on your next purchase. Regardless of your skill level, goals, or budget, there is something here for everyone.
Not yet part of the Club Ready Tribe? Sign up to become a student today and join the strongest DJ community in the world!!
DRUM ROLL... GET THE COMPLETE PACKAGE
Buy all the courses and get over 60% off
For a limited time
CLUB READY DJ COURSE: Value: $295
ADVANCED PERFORMANCE PACK: Value: $395
CLUB PACK: Value: $195
ONE TIME BONUS VIDEOS: Value: $75
BONUS CONTROLLER TO CLUB MINI COURSE: Value: $95
FEEDBACK ON MIXES: Value: $45
MEMBER ACCESS TO CLUB READY TRIBE
DIRECT ACCESS TO ME
TOTAL VALUE: $1295
TOTAL VALUE OF COMPLETE PACKAGE: $1295
>> SALE PRICE: $175 <<
YES! I WANT ALL THIS FOR ONLY $175And I want to be on time for the reduced price!

If you press the button and see the price went back to $1295 it means the promotion has ended and the program is back to its regular price.
This price is a ONE-TIME-ONLY payment and you get to keep the program FOR LIFE.

16 MINI DJ LESSONS FOR FREE!
Not sure where to start? In this mini series I answer many of the questions beginners have about learning to DJ.

CLUB READY DJ COURSE
 Usually
 ADVANCED PERFORMANCE PACK
 Usually
 CLUB PACK
 Usually
 THE COMPLETE PACKAGE
Get all of my courses for life!
TOTAL VALUE: